26 March, 2013

The Brooch

Hello there!

There has been so much going on with our family lately that I did not have so much time to do scrapbooking. This time it seems for real that everything is going to be better and better from now on... Fingers crossed! 

And here is my new project - a brooch. It is the first time I am trying something like this, he he. It is my daughter who asked me if I could do it to her, and how could I say ´no´ to her, he he...

This brooch is made as a contribution to a WOC new challenge - buttons and bows


I used for this project from WOC:
- Vintage Seam binding ribbon
- Organza Rose trim small
- Self adhesive pearls
- Resin Lady Oval Cameo big 

Have a wonderful Easter holiday and many creative moments!

11 March, 2013

A Card with Annabelles´ Meadows

Hello everyone!

Today is a new challenge starting at Wild Orchid Crafts, and this time is a sketch from Kim. And here is my contribution to a challenge - a card with Annabelles´ Meadow paper and printed panel from WRS from Kortgleder


I used from WOC:
- Small gardenias
- Lilies
- Roses 15mm
- Rosebuds 5mm
- Semi open roses 8mm
- Gypsophila
- Vintage seam binding ribbon
- White cotton lace 30mm
- Wooden dove embellishments 
- Green jute ribbon 5cm


And here is a gorgeous sketch from Kim:


Do not forget to participate and win a good prize!

Have a good and creative day!


10 March, 2013

Wedding Chair Centrepiece

Hello everyone!

Here is a beautiful cold but very sunny Sunday outside and I am presenting you my new creation - a Wedding Chair. No no, not a real one, just a centrepiece for bride and groom. I am showing just one of them, but there will be two, with the names on the front of each chair on a label. 
 It is very difficult to make a good photo of a white creation, but hopefully you will enjoy it even if it is a little bit grey, he he...


For this creation I used from Wild Orchid Crafts:
- Cherry blossoms
- Tulips
- Heart shaped pearl beads
- Self-adhesive pearls 3mm
- Vintage seam binding ribbon

For this creation I used from Kortgleder:
- Tonic studios dies Bunch Trellis Wall
- NS Shape Die Flower Swirl 
- NS Heart Dies MFD022


Have a good and creative day!


05 March, 2013

Flower Card Tutorial


Hello everyone!

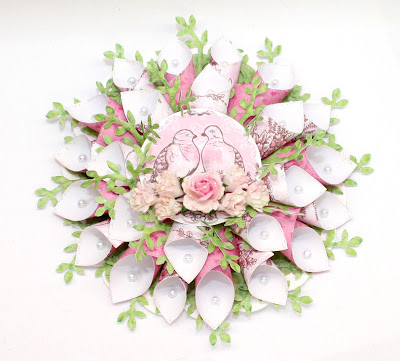
Today I wanna show you a tutorial for a creative way of using Wild Rose Studio paper to make a flower card. This is my contribution to a Spring Challlenge in a Kortgleder´s blogg


And here are the steps to make such a card:

1. Use dies NS MFD053 


And paper from Wild Rose Studio 


2. Make cut out like it shown on a photo


3. Glue those cut outs together like in a photo


4. Use Floral Punch, Branch with embossing, to cut out branches and glue it to the background like on a picture


5. Cut out paper pieces 30x30mm - 16stk. and 40x40mm - 8stk.

6. Use a pen or other stick to twist a paper


7. Glue bigger paper roles to the background in the middle


8. Glue smaller paper roles in between the bigger ones and on the top the same small ones you just glued. 

9. Glue the branches in between smaller roles on the top layer 


10. Glue the centrepiece picture in the middle and decorate the card as you wish.


Have a good and creative day everyone!